Shopping Cart
0 item(s) - R0.00- 3D Printing and Plastic peripherals (8)
- 433Mhz and Lora (9)
-
Amateur Radio (651)
- - Antenna Analyzer (12)
- - APRS (12)
- - ATU (5)
- - CW (1)
- - Digital Modes (9)
- - DMR (4)
- - Echolink (10)
- - Enclosure (13)
- - Eshail-2 (QO-100) (67)
- - GPS (8)
- - iGate (1)
- - Microcontrollers (43)
- - Microphone (1)
- - Power Supply (7)
- - Programming Cable (6)
- - QRP (9)
- - Radio interface (21)
- - Receiver (9)
- - Repeater (4)
- - RF Amplifiers (20)
- - RF Kits (19)
- - RF modules (116)
- - Rotator (1)
- - SDR (75)
- - Spectrum Analyzer (4)
- - SWR (9)
- - Transceiver (59)
- - WSPR (5)
- Antennas and Acc (320)
- Audio and Video (28)
- Bargain Box (1)
- Battery (3)
- Bluetooth (11)
- Cables (37)
- Computer Peripherals (104)
- Connectors (90)
- Data acquisition (1)
- Display (2)
- Electromechanical (25)
- Enclosure (12)
- GPS (6)
- Hardware (3)
- Home Automation (128)
- Inverter (9)
- Liquid (7)
- Lora (8)
- Microcontrollers (119)
- Modbus (3)
- MQTT (14)
- Network Radio (3)
- Networking (8)
- Power (133)
- Power supply (49)
- Radio Interface (17)
- RF Modules (142)
- ROIP (2)
- Satellite (93)
- Security (13)
- Sensor (17)
- Solar (14)
- Test and Measurements (66)
- Tools and Equipment (8)
- VOIP (10)
- Weather (1)
Universal Wideband small signal RF Amplifier
Ex Tax: R275.90
Add to Compare
Universal Wideband small signal RF Amplifier
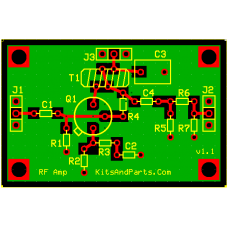
This kit is part of what Diz calls RF Tool Kits, Electronic Building Blocks. He has a number of these kits and more come out every so often. I like to look at what he has to offer and build some of them homebrew style from the data he has on-line. I also buy many kits from him which keeps him coming out with new items and ideas all the time. He also has a large inventory of "roids" (toroids) as well as parts and odds-and-ends. His banner on the web page says it much better... Supplying Toroids, Electronic Parts and Kits to Engineers, Schools and Hobbyists.
OK, here is the schematic of the Universal Wideband Amplifier (UWA):
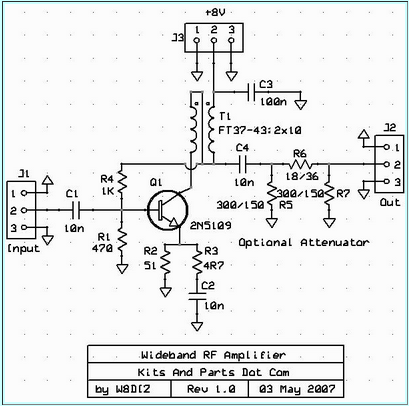
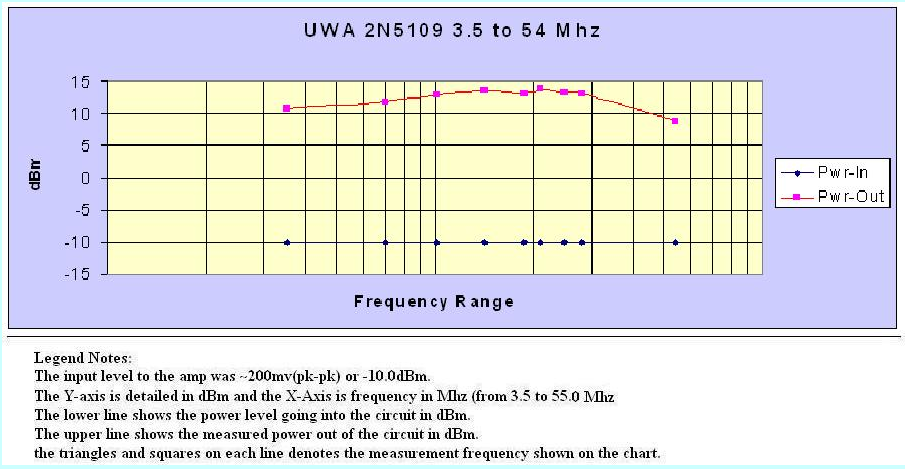
The amp is straight forward and simple, yet remarkable. Diz boasts it has a7x voltage gain or about 17 dBm power gain easured at 10 MHz with 50 ohms I/O and powered with 8 volts DC. It is that and a tad more. The concept of Vcc being 8v-dc is a very practical approach if one were to use this circuit in a minimal rig that includes a NE602/612 and LM386 chips. I found that raising the Vcc voltage up to 12 volts did not yield any appreciable gain.
The amp circuit's output is consistent when used for 3.5 to 30 Mhz, providing about a 22 to 23 dBm increase over its input signal level. I looked at the output level for 6 meters and it was slightly down from the 3 to 30 Mhz range.
I have graphed a chart (see below) that shows the power increase of the circuit. Also shown is the raw data from my measurements. I used a Singer CSM-1 for my signal source, a Tek 2465 o-scope for verifying input signal levels (~200mv pk-pk), the M3 Power/Frequency meter, and a 0 to 90 dBm attenuator to pad the input to my W7ZOI Spectrum Analyzer.
Instructions:
1. Decide the output impedance of the RF Amp, 50 or 200 Ohms. Default is 50 ohms.
For 50 ohms, wind 10 turns bifilar using the included wire.
For 200 ohms, unwind the twisted pair magnet wire. Use one wire to make a 10 turn choke.
Prepare the toroid wires for soldering - Magnet Wire Soldering Details Here
This magnet wire uses multiple layers of insulation and is NOT heat stripable.
2. Install and solder T1.
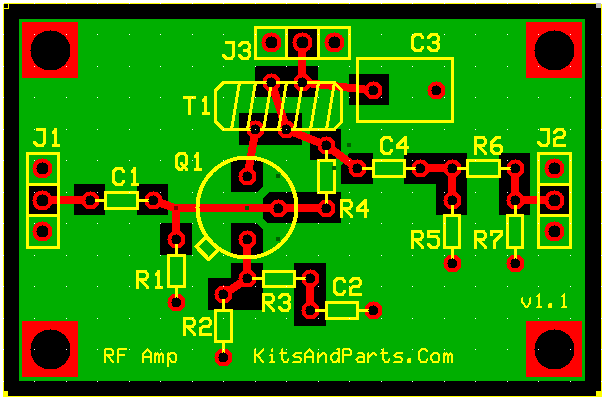
For 50 ohms, install per the PCB picture. Note the 2 different colors of the magnet wire.
One color wire should connect to J3/C3 and the other color connects to Q1
You should also have 2 different color wires connecting under the toroid via a PCB trace.
For 200 ohms, install the T1 between J3 at one end. The other end of T1
connects to Q1 and C4.
Then place a jumper wire from the lower left toroid hole to the upper left toroid hole.
This will connect Q1 and C4 to one leg of T1. The other leg of T1 connects to J3 and C3
3. R5, R6 and R7 are not included. Solder a jumper wire in place of R6.
4. Install Q1 to the PCB leaving about 1/16" (1 or 2 mm) space between the Q1 and the PCB
5. Install all remaining parts.
6. Connect the RF Amplifier via J1, J2 and J3.
Write a review
Your Name:Your Review: Note: HTML is not translated!
Rating: Bad Good
Enter the code in the box below:
Giga Technology © 2025

