
Your shopping cart is empty!
Categories
- 3D Printing and Plastic peripherals (8)
- 433Mhz and Lora (8)
- Support (2)
-
Amateur Radio (668)
- - Antenna Analyzer (12)
- - APRS (12)
- - ATU (5)
- - CW (1)
- - Digital Modes (9)
- - DMR (4)
- - Echolink (10)
- - Enclosure (14)
- - Eshail-2 (QO-100) (67)
- - GPS (9)
- - iGate (1)
- - Microcontrollers (43)
- - Microphone (1)
- - Power Supply (7)
- - Programming Cable (6)
- - QRP (9)
- - Radio interface (26)
- - Receiver (11)
- - Repeater (4)
- - RF Amplifiers (20)
- - RF Kits (20)
- - RF modules (118)
- - Rotator (1)
- - SDR (78)
- - Spectrum Analyzer (4)
- - SWR (9)
- - Transceiver (60)
- - WSPR (5)
- Antennas and Acc (322)
- Audio and Video (28)
- Aviation (6)
- Bargain Box (1)
- Battery (3)
- Bluetooth (11)
- Cables (37)
- Computer Peripherals (105)
- Connectors (93)
- Data acquisition (1)
- Display (2)
- Electromechanical (26)
- Enclosure (13)
- GPS (7)
- Hardware (4)
- Home Automation (128)
- Inverter (9)
- Liquid (7)
- Lora (8)
- Microcontrollers (121)
- Modbus (3)
- MQTT (14)
- Network Radio (3)
- Networking (9)
- Power (135)
- Power supply (49)
- Radio Interface (21)
- RF Modules (144)
- ROIP (7)
- Satellite (95)
- Security (13)
- Sensor (17)
- Solar (14)
- Test and Measurements (66)
- Tools and Equipment (8)
- Tracking (4)
- VOIP (15)
- Weather (1)
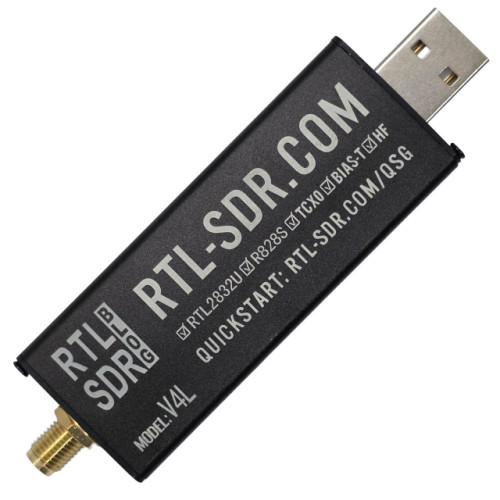
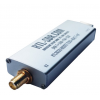
RTL-SDR Blog V4L R860 RTL2832U 1PPM TCXO SMA Software Defined Radio 500 kHz to 1.7 GHz (Dongle Only)
Price: R1,001.79
Ex Tax: R871.12
Ex Tax: R871.12
Qty:
- OR -
Add to Wish List
Add to Compare
Add to Compare

GIGA TECHNOLOGY | SOFTWARE DEFINED RADIO
RTL-SDR Blog V4L (Lite) USB SDR Receiver (Dongle Only)
500 kHz–1.766 GHz • R828S tuner • 1 PPM TCXO • Built-in HF upconverter • 4.5 V bias tee
A versatile, receive-only software-defined radio for amateur radio enthusiasts, radio monitoring, aircraft tracking, SDR experimentation and educational projects.
Please check the license details you will need to purchase this unit (Please note you will need an Amateur Radio License to purchase this item) Icasa will have to issue you with the necessary license to use this unit (It will depend on the use of the device). We would require a copy of your license or callsign. See section in G14 in this document http://www.zs6wr.co.za/live/wp-content/uploads/2010/10/RadioRegs-Act-No.-103-of-1996-Amentment-2005-2007-1.pdf Section G14 Radio receiving apparatus with continuous tuning (1) No person shall use or have in his possession any radio receiving apparatus with continuous tuning that can be tuned to bands above 30 MHz other than the international broadcasting and amateur bands except where the Postmaster General's prior approval was obtained.
IMPORTANT – V4L DRIVER REQUIREMENT: The new V4L is not identical to the V4. It uses the R828S tuner and needs a recent V4L-compatible RTL-SDR driver. An older V3/V4 driver may detect the device but produce no usable reception. Follow the Windows or Linux guide below before troubleshooting your antenna.
What can you receive?
The RTL-SDR Blog V4L can monitor many analogue and digital radio signals with suitable software and an appropriate antenna: FM broadcast, shortwave and amateur HF transmissions, VHF/UHF amateur radio, airband AM, APRS packet radio, AIS marine transmissions, 1090 MHz ADS-B aircraft messages, weather satellite signals and more. Decoding support depends on the software, signal, local conditions and applicable law. This is a receiver only; it cannot transmit.
Technical specifications
| Model | RTL-SDR Blog V4L (Lite) |
| Tuner / ADC | Rafael R828S / RTL2832U (8-bit) |
| Frequency coverage | Approx. 500 kHz to 1.766 GHz |
| Sample bandwidth | Up to approx. 2.56 MHz reliably; higher rates may lose samples |
| Frequency reference | 1 PPM TCXO |
| HF reception | Integrated upconverter; no direct-sampling setting required |
| RF front end | HF / VHF-UHF diplexed filtering |
| Antenna connector | 50-ohm SMA female |
| Bias tee | Software-controlled 4.5 V DC, up to 180 mA continuous |
| USB / enclosure | USB-A / aluminium enclosure |
| Operating systems | Windows and Linux with compatible drivers and applications |
V4 vs V4L: The original V4 uses an R828D tuner and a triplexed RF input. The V4L uses an R828S tuner and a diplexed input. It retains the built-in HF upconverter, 1 PPM TCXO and bias tee. Reduced front-end filtering can make an external filter helpful near strong transmitters.
Windows 10 / Windows 11 installation
Recommended first application: SDR++ (SDRPlusPlus). You need two separate software components: (1) the USB WinUSB driver installed with Zadig, and (2) a V4L-compatible RTL-SDR application library (typically rtlsdr.dll).
Step 1 – Download the required software
- Zadig (WinUSB installer): https://zadig.akeo.ie/
- RTL-SDR Blog updated Windows driver DLL: GitHub driver releases (download the latest release ZIP).
- SDR++: https://www.sdrpp.org/
- Alternative SDR# (SDRSharp): Airspy downloads
Step 2 – Install the USB driver with Zadig
- Connect the RTL-SDR V4L to a USB port on your computer and let Windows finish detecting it.
- Run Zadig as Administrator.
- Select Options > List All Devices.
- Select the RTL-SDR entry, often shown as Bulk-In, Interface (Interface 0), RTL2832U or Blog V4L. Check the USB ID is 0BDA:2838 and ensure you have selected Interface 0 (not Interface 1).
- In the driver selection on the right, choose WinUSB.
- Click Install Driver or Replace Driver and let installation finish.
Warning: Carefully confirm the device before installing via Zadig. Selecting the wrong USB device could replace the driver for your keyboard, mouse or another peripheral.
Step 3 – Install SDR++ and the V4L-compatible DLL
- Download and extract the current SDR++ Windows build into a normal writable folder.
- Download and extract the latest RTL-SDR Blog driver release ZIP.
- Close SDR++ if it is running. In the driver release choose the x64 folder for a 64-bit SDR++ build (or x86 for a 32-bit application).
- Locate the application's existing
rtlsdr.dllfile, back it up, then replace it with the matching updated file. Depending on the package layout this may be in the application directory or a subfolder. If the application useslibrtlsdr.dll, consult its specific guide rather than blindly renaming files. - If prompted about missing runtime libraries, use the matching
msvcr100.dllandpthreadVC2.dllsupplied by the driver release, or the runtime indicated by the application. - Launch SDR++. In Source, select RTL-SDR, choose the connected device, then press Play.
- Set a sample rate such as 2.048 MSPS, start with manual RF gain, and select WFM for a strong local broadcast FM station.
Tip: Newly updated SDR applications may already contain a V4L-capable RTL-SDR library. If your software works correctly with the V4L, do not replace its working DLL unnecessarily.
Alternative – SDR# (SDRSharp)
- Download the latest official SDR# package from Airspy, extract it completely and install any Microsoft runtime prerequisites stated on the download page.
- Run the package's
install-rtlsdr.batto fetch updated RTL-SDR support files; the current installer is designed to retrieve RTL-SDR Blog drivers. - If needed, manually replace
rtlsdr.dllusing the x86 version in the RTL-SDR Blog release (for the 32-bit SDR# package). - Install WinUSB with Zadig as described above, select RTL-SDR USB as the source, configure gain and press Play.
HDSDR / SDRUno
These applications may require the V4L-compatible ExtIO plugin. Download it from RTL-SDR Blog ExtIO releases, place the appropriate DLL into the application's folder and select the ExtIO source. Disable IF AGC on the V4L.
Linux installation – Ubuntu / Debian / Raspberry Pi OS
On Linux, build an up-to-date version of the RTL-SDR library with V4L support. The upstream Osmocom repository has added V4L support. These commands affect your system-wide RTL-SDR installation. If you already run FlightAware, OpenWebRX, GNU Radio, a SoapySDR stack or another package that depends on the distribution's RTL-SDR libraries, review the dependencies first.
Step 1 – Install build requirements
sudo apt update
sudo apt install -y git cmake build-essential pkg-config libusb-1.0-0-dev
Step 2 – Remove conflicting older RTL-SDR installation, if present
If you have an older RTL-SDR package that does not support V4L, remove it before installing a newer one. Do not remove packages blindly on an existing SDR server. On a new standalone installation, the manufacturer's recommended removal command is:
sudo apt purge 'librtlsdr*'
Old manually installed copies of librtlsdr in /usr/local/lib can also conflict. Inspect them before removal rather than deleting unrelated files.
Step 3 – Download and build the current source
git clone https://github.com/osmocom/rtl-sdr.git
cd rtl-sdr
mkdir build
cd build
cmake .. -DINSTALL_UDEV_RULES=ON -DDETACH_KERNEL_DRIVER=ON
make -j$(nproc)
sudo make install
sudo ldconfig
The upstream project's installation process normally provides the device rules when INSTALL_UDEV_RULES=ON is enabled. If required, explicitly install the included rules and reload udev:
sudo cp ../rtl-sdr.rules /etc/udev/rules.d/
sudo udevadm control --reload-rules
sudo udevadm trigger
Step 4 – Prevent the Linux DVB-TV driver from claiming the dongle
echo 'blacklist dvb_usb_rtl28xxu' | sudo tee /etc/modprobe.d/blacklist-dvb_usb_rtl28xxu.conf
sudo reboot
Step 5 – Verify the V4L
After restarting, reconnect the SDR and run:
rtl_test -t
You should see the RTL-SDR device detected and sample-test output. Stop other SDR applications before testing. If access is denied, check udev rules and group permissions; if the kernel DVB driver has claimed the device, check the blacklist and reboot.
Step 6 – Use it with Linux SDR software
Install a current SDR++ or GQRX build that uses the V4L-compatible librtlsdr. Choose the RTL-SDR input, start at 2.048 MSPS, and adjust RF gain. Important: Flatpak, Snap and AppImage versions may bundle an older driver internally; installing a system library may not update these packages. For SoapySDR/GNU Radio integrations, you may need to rebuild or reinstall the corresponding plugin.
Raspberry Pi / ADS-B receivers: These steps also apply in principle to Raspberry Pi OS, but packaged services such as readsb, dump1090-fa, FlightRadar24 and OpenWebRX may depend on a specific distribution package. For an existing working installation, use the manufacturer's V4L package-upgrade instructions instead of mixing independently installed libraries.
First reception and radio configuration
- Connect an antenna: Use an SMA-compatible antenna for the band of interest. Ensure that any outdoor antenna installation has suitable lightning and grounding protection.
- Select source: Choose RTL-SDR / RTL-SDR USB, then the V4L device.
- Sample rate: Start at 2.048 MSPS. If USB dropouts occur, lower the rate.
- Gain: Disable automatic tuner gain initially and raise manual gain gradually until signals appear without overloading.
- Mode: Use WFM for 88–108 MHz broadcast FM, AM for airband, NFM for narrowband FM and USB/LSB for SSB amateur transmissions.
- Test station: Tune to a strong local FM broadcast station in the 88–108 MHz range with WFM selected. You should see a signal in the spectrum/waterfall and hear audio.
HF (shortwave) reception: The V4L has a built-in upconverter. With a compatible driver, tune directly to the desired HF frequency; do not select V3-style direct sampling or manually enter a 28.8 MHz converter offset unless specifically required by unusual third-party software.
Using the 4.5 V bias tee
The V4L can supply up to 180 mA at approximately 4.5 V on the antenna feed to power a compatible LNA or active antenna. It is off unless explicitly enabled in supported software. Do not enable it into an antenna that is DC-shorted directly at the input. In RTL-SDR Blog-compatible drivers, some applications expose bias tee as Bias-T or Offset Tuning. With the manufacturer's tools, stop the SDR application and use:
rtl_biast -b 1   # Enable bias tee
rtl_biast -b 0   # Disable bias tee
Use only if your installed driver package includes rtl_biast. On Windows the executable is normally named rtl_biast.exe. An indicator LED near the SMA connector illuminates when the bias tee is active.
Suggested software and uses
| Application | Typical use | Website |
|---|---|---|
| SDR++ | General-purpose receiver and waterfall | sdrpp.org |
| SDR# | Windows radio reception | Airspy |
| GQRX | Linux SDR receiver | gqrx.dk |
| SatDump | Satellite signal processing | satdump.org |
| readsb / dump1090 | 1090 MHz ADS-B aircraft reception | readsb |
| rtl_fm / rtl_tcp | Command-line reception and network streaming | Osmocom RTL-SDR |
Software compatibility varies by version. Confirm that the application uses an up-to-date V4L-compatible RTL-SDR driver or replace its bundled library as directed by the vendor.
Troubleshooting
Device is detected but nothing is received: The most common V4L issue is an old driver. Update the application's RTL-SDR library. Check that the correct device/source is selected and RF gain is not at zero.
Windows “device not found”: Reconnect the dongle, confirm WinUSB on the correct Interface 0 using Zadig, close other programs using the SDR, and try another USB port.
Linux “device busy” or “kernel driver active”: Stop other SDR processes, confirm the DVB-TV module is blacklisted and reboot. Ensure the program is loading the intended current librtlsdr rather than an older packaged copy.
Poor reception or many false signals: Verify the antenna and connector, reduce RF gain, try a suitable band-pass filter or attenuator, and move away from computers/USB noise. The V4L has less RF input filtering than the original V4.
Stuttering audio / dropped samples: Reduce sample rate to 1.024 or 2.048 MSPS, avoid overloaded USB hubs, and stop unnecessary applications.
No HF signals: Do not select direct-sampling/Q branch and do not set a manual upconverter frequency shift. Use a suitable HF antenna and confirm the installed library is V4L-aware.
Incorrect identification: Avoid changing the dongle's EEPROM manufacturer/product fields. The RTL-SDR Blog drivers identify the V4L using RTLSDRBlog and Blog V4L.
Official guides and downloads
- RTL-SDR Blog V4L (Lite) official user guide – model-specific driver updates and special features.
- RTL-SDR official quick-start guide – screenshots for Windows/Zadig/SDR software.
- RTL-SDR Blog Windows driver releases – updated DLL files.
- Osmocom RTL-SDR source – Linux-compatible library and utilities.
- RTL-SDR V4L Manual --- Manual that comes with the RTL-SDR V4L dongle
Giga Technology – SDR, RF & Amateur Radio Equipment
For accessories such as antennas, SMA adapters, coaxial cables, filters and low-noise amplifiers, explore our store at www.giga.co.za.
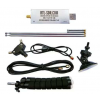
Installation information checked November 2026. Software and driver support can change; follow the linked manufacturer's instructions if they have been updated. Product package contents depend on the selected listing and are not implied by the examples above.
Write a review
Your Name:Your Review: Note: HTML is not translated!
Rating: Bad Good
Enter the code in the box below:

















Powered By OpenCart
Giga Technology © 2026
Giga Technology © 2026